
I’m doing something a little different today and sharing how I record and edit videos for Instagram and YouTube. I’ve gotten a few requests and wanted to show you my setup in case it would help you record fine art videos for your Instagram, YouTube, Facebook Lives, or more.
Pin for later


The Equipment I Use for Top-Down Art Demo Video Recording
-
Camera: all of the older videos on YouTube were recorded with an iPhone 6S, and now I’m using my iPhone 8 Plus.
-
Audio: Apple EarPods or Apple AirPods.
-
iPhone holder: Lazy Arm iPhone desk mount
-
Lighting: Diva Ring Light (see note above!) and light stand
-
Video Editing Software: ScreenFlow (Mac only)
-
Audio Recording: Voice Memos (native to iPhones)
Check out the video at the bottom for a demo of the tripod and an overview of my setup; otherwise all of the important info is below!

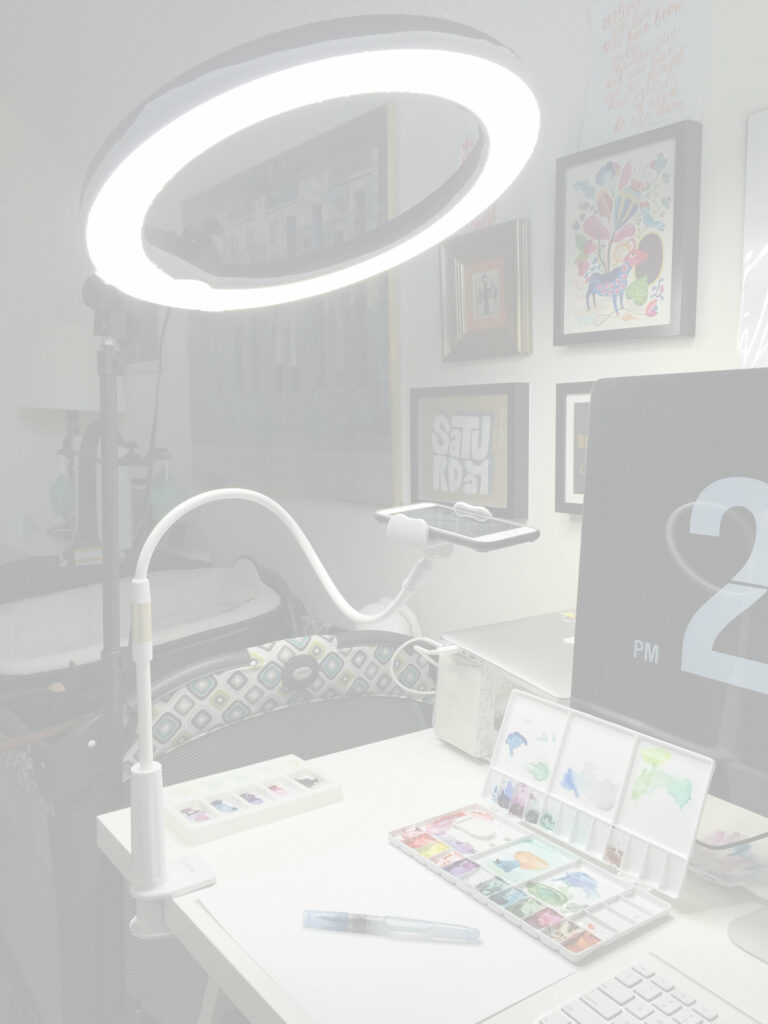
My office is different from this one shown, but the video setup is the same!
Video and Lighting Equipment I Use for Art Demo Videos
The Camera
When I originally wrote this post, I recorded all video with my iPhone 6S’s camera (now I use my iPhone 8 Plus whenever I record video).
When I started recording demo videos for my first Skillshare class, I was using my iPhone 5S. You certainly don’t need to go out and get a fancy camera or camcorder; just keep in mind that if you are going to use your iPhone or smartphone, make sure to use the rear-facing camera and not the front-facing camera. The quality will be a lot higher.
iPhone Holder / Tripod
For my “tripod”: I use a Lazy Arm iPhone desk mount which is the biggest game-changer. The bendable arm is strong but pliable and doesn’t jiggle around or slide out of place. I have it clamped to the edge of my desk and I can easily just stretch the mount and plop my iPhone in there to record.
Video Lighting
For video lighting, I use a Diva Ring Light on its brightest setting and mount it to a light stand.
I originally purchased the Diva Ring Light as a portable light for talking-head videos, but I find I use the light often as a daylighting lamp to work on art when it’s dark outside, as well as to help me record brighter videos.
The whole system folds away pretty easily, which is good news for multipurpose spaces. (IE: My “office” is in my kids’ room right now….)
Important note: The Diva Ring Light link above doesn’t have the same bendable head mount like the one I use. There have been a few people that have an issue with this, so please do your research before purchasing!
Audio Microphone
When I record videos, I’ve used my in-box Apple EarPods to record audio. I now use my Apple AirPods. Plain and simple; no fancy microphone or lavalier lapel mic needed.
Recording Audio
If I have any videos that require audio-only, such as when I’m recording a voiceover for a slideshow or a demo, I will simply use Voice Memos on my iPhone with the Apple AirPods. The quality comes out surprisingly great!
Editing iPhone Videos for Instagram and YouTube
When I’m ready to edit my videos, I import the raw footage to my MacBook using AirDrop. (I’m too impatient to let it sync with Photos.)
Next, I’ll create a new document in ScreenFlow (Mac only).
Instagram Videos
Since in-feed Instagram videos can only be 15 seconds long, I usually need to speed up the video so it fits within the time allotted.
I know there are apps I can use on my phone, but I like the control I get from editing it on my computer. (That said—if you’re using any must-have video editing apps for Instagram, leave a comment below to help me out!)
Here’s my process for editing in-feed Instagram videos:
-
Create a new document in ScreenFlow that is 1080px square.
-
Drop the footage into the document and right-click to detach the audio.
-
Delete the audio entirely from the project.
-
Slice the video so it has a clean beginning and end. Delete the trimmings.
-
Finally, speed up the video by double-clicking on the segment and increasing the speed until the remaining clip is at 15 seconds.
-
Export the video with H.264 video encoding at 3,000 kbits/sec.
-
Share back to my iPhone with AirDrop and post to IG.
How to Edit Videos for YouTube
YouTube videos are pretty similar to the above instructions. I create the document in ScreenFlow to be 1920px by 1080px, and then export the video with H.264 video encoding at 5,000 kbits/sec, and AAC audio encoding at 256 kbits/sec.
I also do a ton of other splicing and editing with YouTube videos, playing with B-roll footage, intro music, and outro branding.

Click to Read Video Transcript
- In this video, I’m going to show you my setup for Instagram and YouTube videos. These are the equipment and pieces I use to record and edit video.
- So when I record Instagram videos, I want to make sure that the lighting is very good. So I use this light called the diva ring light. It’s a dimmable led based light and it kind of has a halo. So it gets a good diffused light all over the place. It looks like natural lighting. So it’s just on a light stand that’s on the floor here.
- And then for my tripod, I use this Benks lazy arm, and I love it. This is a huge game changer. You can see how sturdy it is.
- I’ve just snapped my iPhone on here. Obviously I can’t show you my iPhone in here, cause I’m using it to record this video, but I’ll just snap it in here, face down. And that way I get a good heads-down view of my art area. The arm just clamps onto here to my desk. And you can adjust it to be really, really wide if you need it. This also swivels around really easily.
- So once I’m done with the video, I can just push it out of the way. I can also take it off my table pretty easily.
- So this is my setup. Again, make sure to check out the blog post for more information on software I use and other equipment I use. I hope this was helpful and I’ll talk to you in another video.
TL;DR? Art Demo Video Recording Resources
Long story short, here’s what I use for art demo videos:
-
Camera: all of the older videos on YouTube were recorded with an iPhone 6S, and now I’m using my iPhone 8 Plus.
-
Audio: Apple EarPods or Apple AirPods.
-
iPhone holder: Lazy Arm iPhone desk mount
-
Lighting: Diva Ring Light (see note above!) and light stand
-
Video Editing Software: ScreenFlow (Mac only)
-
Audio Recording: Voice Memos (native to iPhones)
I hope you found this post helpful! I am by no means a video expert, but these are the settings I’ve researched that work best for me. If you have video recording tips to share, please comment below!


Learn Brush Lettering in One Weekend (Or Less)
Whether you’re a brush lettering fan, an artist, a hobbyist, or a side-hustler, Brush Lettering Basics will get you up and running with all you need to know about brush lettering—quickly!